
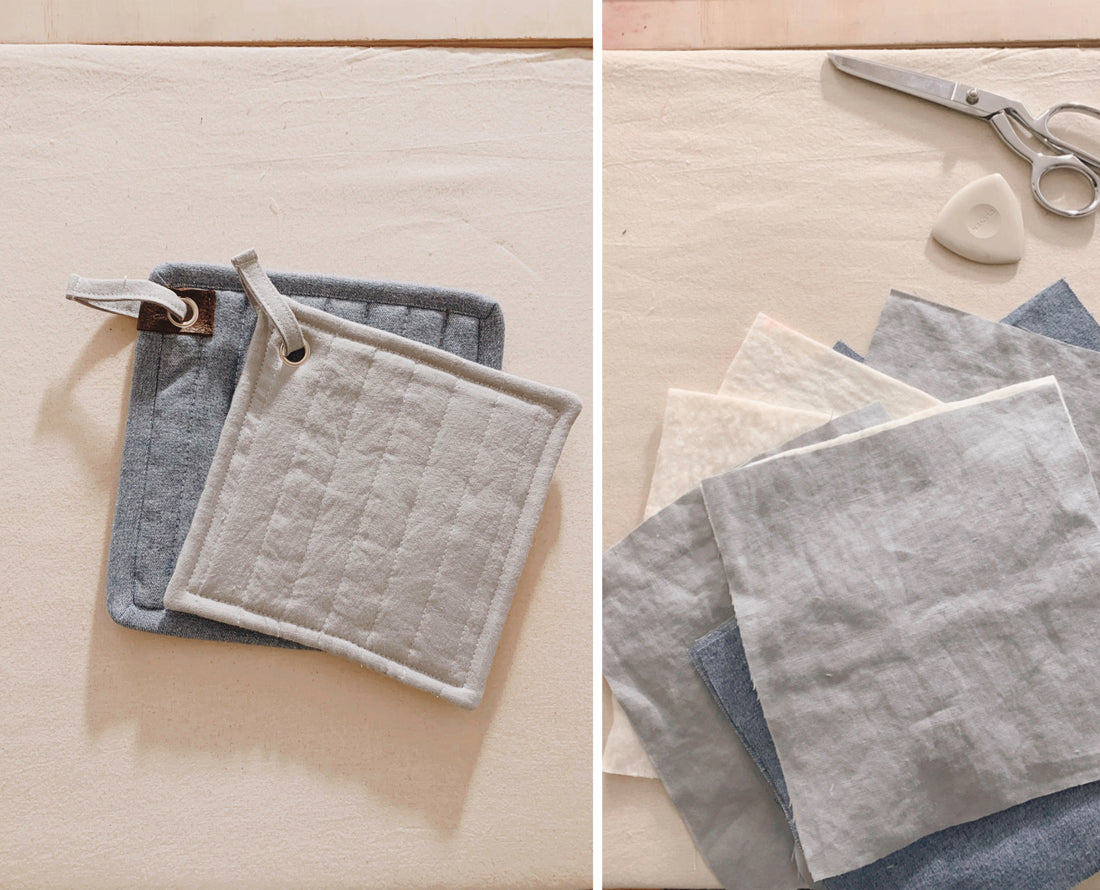
handmade gifts have that extra special touch and a pair of pot holders make the perfect holiday/housewarming gift!
(in the video I use a grommet to attach my tab while the instructions below will show how to sew on your tab)
notions + machines:
natural fabric such as linen or cotton
cotton batting
canvas or denim
chalk / wax / fabric pen
ruler - grid ruler works best
thread
pins
scissors / rotary cutter
straight stitch machine

LAYERS:
first decide how big you want to make the squares, I chose 8" x 8". your holders will come out slightly smaller than this measurement.
you will be cutting 2 squares from each of the three layers. this makes one pot holder so multiply this amount by how many holders you're making.
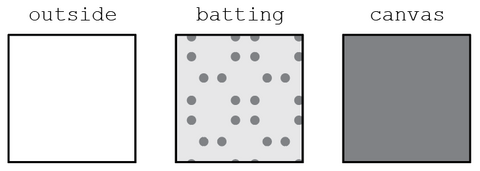
the outer later is the fabric you want to see. you can choose any weight cotton or natural fabric you like just stay away from synthetic fibres as they tend to melt. I chose a medium weight linen.
the second layer is cotton batting to help add thickness and repel heat. you can use poly but I find it heats up too quickly.
the third and center layer is a thick layer of any cotton fabric such as denim or canvas. this layer is important to help repel heat.
so for each holder it will go: outer layer, second layer, third layer, third layer, second layer, outer layer - as shown in the diagram above.
a thick pot holder is needed to ensure you will be able to pick up a pot without burning yourself after a few seconds. to make sure your holders are thick enough, try picking up a hot pan/pot (with caution!) and make sure you can hold the pan for a good amount of time before it starts to burn. if you can't hold it longer than a few seconds, add another layer or two of batting or canvas.
BINDING:
you can use pre-made binding or you can make your own. if you are using pre-made choose 1/2" double folded binding. to make your own bias tape, cut strips of your outer layer fabric 2" wide. you can sew strips together if you need to make your tape longer. you don't need to cut these strips on the bias as we're sewing along a straight edge.

STEP 1:
choose one outer layer from each holder to draw your quilting lines on. using an erasable fabric pen or chalk start by drawing one line down the center of your squares. then make the rest of your lines on either side of the line. I made my lines 1" apart, you can do any width. once you have all your lines drawn on your two outer squares, layer your holders as described above: outer layer, second layer, third layer, third layer, second layer, outer layer. pin each holder with all its layers together. then stitch along your quilting lines using a slightly larger stitch, I used 4 on my industrial machine, start with 3 if you're using a domestic and lengthen as desired.

STEP 2:
cut a 2" wide strip of your outer fabric, any fabric, or your pre-made bias tape. the length of the strip is however long you want your tab to be times the number of holders you're making. my tabs were about 4.5 inches long. press your strip in half to create a center crease. now fold your edges in to match at the center crease. next fold those edges on top of each other and edge stitch all the way down the open side.

STEP 3:
stitch around the edges of your square about 1/4" away from the edge. trim sides so the layers are all even. fold your tab in half and tack on one corner.
STEP 4:
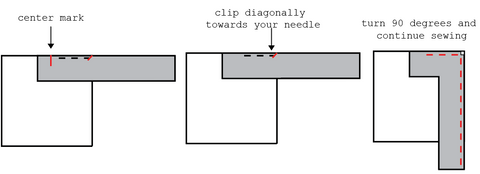
make a mark in the center on one edge of your square. pin the edge of your bias tape about 1" above this mark. you are going to start stitching about 2" down from this mark (this is so we can clean finish our tape together when we're done) with a seam allowance of 1/2". when you get to each corner keep your needle down and clip your tape from the edge right to where you needle is. lift your foot and rotate your square 90 degrees.

continue sewing down each side until you get to the edge you started on. stop sewing about 4" from where you started sewing NOT from your center mark. mark where either end of your bias tape matches that center notch you made at the beginning of this step.
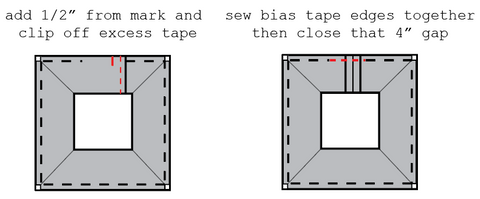
then mark a seam allowance of 1/2" from that mark and clip off the excess tape. now sew your bias tape edges together using a seam allowance of 1/2" and finish stitching down that 4" gap.

STEP 5:
flip your bias tape over and fold the edge up 1/2". now fold that edge over so it lays on top of your square.

tuck each corner under so it makes a diagonal seam or mitered corner. use pins to help secure in place then edge stitch your bias tape down.

STEP 6:
give your holders a quick press and you're done! you now have beautiful handmade pot holders.
1 comment
That is very detailed thank you I am very interested. ThanksTB.